Airflow
Airflow is an open source Orchestrator first developed at Airbnb and later donated to the Apache Foundation as a top-level project
Airflow handles
- authoring
- monitoring
- scheduling
of tasks using DAGs
⚠️ - Airflow 2.0
Airflow 2.0 is expected to be generally available in December 2020
Going forward, there are going to be breaking changes in imports, the UI and other details.
For an overview of what’s coming, read this by the Astronomer team
Setting up Airflow
Installation
In a virtualenv
pip install apache-airflow[crypto,azure,docker,postgres]
Start Airflow
Airflow puts its files into $AIRFLOW_HOME, so set that or use the default, ~/airflow.
export AIRFLOW_HOME=~/where/i/want

airflow initdb
Start two new terminals
run the webserver
export AIRFLOW_HOME=~/where/i/want
airflow webserver
run the scheduler
export AIRFLOW_HOME=~/where/i/want
airflow scheduler
Navigate to localhost:8080 and check the UI
Change the config
Start by getting rid of the examples and default connections
# airflow.cfg
[core]
load_examples = False
load_default_connections = False
Reset the database to clear the defaults
airflow resetdb
Next, we switch to the new UI
# airflow.cfg
[webserver]
rbac = True
Add an admin user to the database
airflow create_user --role Admin --username admin --firstname Anders --lastname Bogsnes --email andersbogsnes@gmail.com
Restart the webserver and have a look at new, shiny UI! localhost:8080
What is a DAG?
A DAG is a Directed Acyclic Graph
Directed
Goes in one direction only
Acyclic
No cycles, loops
Graph
An order of operations. First A then B then C
Why does it matter?
- DAGs are very useful for pipelines
- They let us describe a workflow programatically, that is easy for an orchestrator to execute.
No matter where we are in the graph, the orchestrator knows what are the next possible options.
A DAG
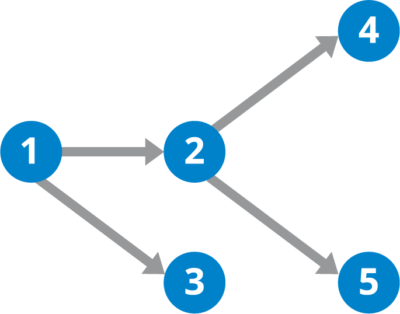
2 and 3 can run in parallel
4 and 5 can't start until 2 has finished
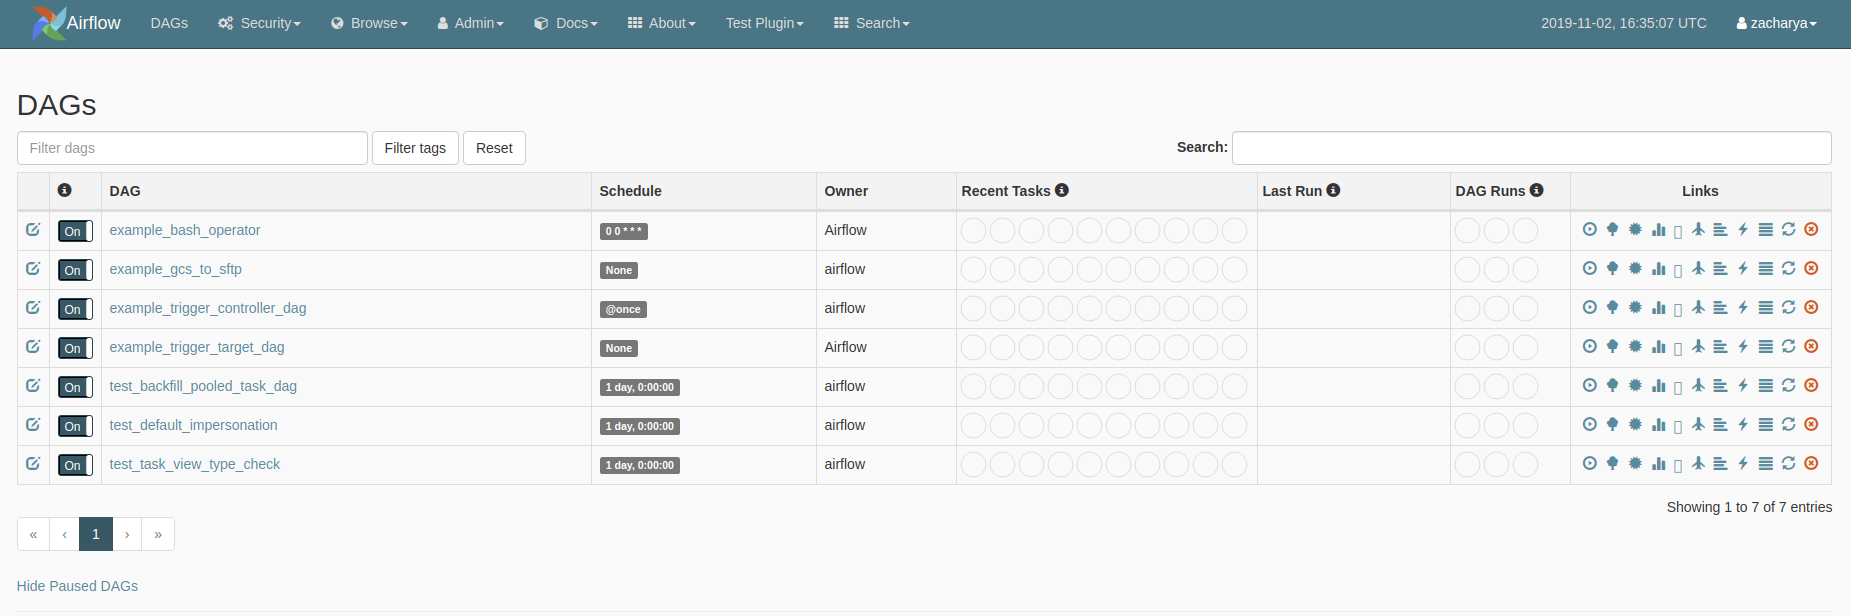
The Dag View
In the Airflow UI, the Dag View looks like this:
Defining an Airflow DAG
DAGs in Airflow are defined by python code
This adds a lot of flexibility when defining DAGs
The DAG
from airflow import DAG
from airflow.utils.dates import days_ago
from datetime import timedelta

default_args = {
    'owner': 'me',
    'start_date': days_ago(2),
}

dag = DAG(
    "my_dag",
    default_args=default_args,
    description="My Awesome DAG",
    schedule_interval=timedelta(days=1),
)
Tasks
The DAG contains the tasks needed to fulfill the business logic.
Airflow includes many such tasks - they are called Operators
from airflow.operators.bash_operator import BashOperator

t1 = BashOperator(
    task_id='print_hello_world',
    bash_command='echo hello_world',
    dag=dag
)
from airflow.operators.python_operator import PythonOperator

def hello_world():
    print("Hello World from Python")

t2 = PythonOperator(
    task_id='python_hello_world',
    python_callable=hello_world,
    dag=dag
)
from airflow.operators.docker_operator import DockerOperator

t3 = DockerOperator(
    task_id="docker_hello_world",
    image="hello-world",
    dag=dag
)
⚠️
Dag files are parsed by Airflow every second - don’t have any executing code in here!
Setting dependencies
Define dependencies between tasks with >> or the .set_upstream()/.set_downstream() method. Generally >> is preferred
t1 >> t2 >> t3
The DAG Bag
Airflow automatically loads all DAGs from the dag folder in $AIRFLOW_HOME.
Exercise 1
Make a DAG in the dag folder with the following tasks
- Write a python function which takes a text
- The function should take a keyword arg
nwhich specifies how many times to repeat the text - The function should write the input text
ntimes to a local file in/tmp - Create a DAG
- Create a PythonOperator to run the function
- Create a BashOperator to read the results of the file
- Add them to the DAG
- Execute them in the UI
Solution 1
from airflow import DAG
from airflow.operators.bash_operator import BashOperator
from airflow.operators.python_operator import PythonOperator
from airflow.utils.dates import days_ago

default_args = {
    "owner": "airflow",
    "start_date": days_ago(2)
}


def write_text(text: str, n=1) -> None:
    with open("/tmp/demo_text.txt", "w") as f:
        f.write(text * n)


with DAG("repeat_text",
         default_args=default_args,
         schedule_interval="@once") as dag:
    t1 = PythonOperator(
        task_id="run_code",
        python_callable=write_text,
        op_kwargs={"text": "Hello World\n", "n": 5},
    )

    t2 = BashOperator(
        task_id="echo_code",
        bash_command="cat /tmp/demo_text.txt"
    )

    t1 >> t2
The Operator
Operators in Airflow represent a task that Airflow will run
Examples of Tasks
- Move file from A to B
- Execute this code
- Run this SQL
- Send an email
- Post to Teams
PythonOperator and BashOperator are two examples of tasks we have already used, but Airflow comes with many operators built in.
For a complete list:
Working with Azure Blob Storage
Azure Blob Storage is basically the same as a network drive that is attached to the internet instead of being mounted to your computer
This is important for two main reasons
- Ease of access - can access from anywhere with internet
- Credentials are handled on-demand
Setup
Setup a new folder and new venv
Start by installing the azure python SDK
pip install azure-storage-blob
Important Concepts
- The Account
- The Container
- The Blob
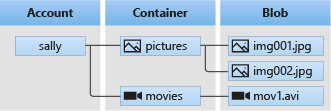
The Account
The account name is given when we create the Blob Storage and doesn’t change, similar to a youtube account or dropbox account
The Container
In the account, we can create containers - akin to directories to hold various files.
The Blob
Contains the actual data - is a file of any shape or size
Credentials
To be allowed access to the data, we need credentials.
There are a few different ways of being given access to data.
- Access keys
- SAS token
- User credentials
Access keys
Access keys are a fixed password that gives full access to the storage account - basically admin access
Can be regenerated but can’t set expiration date
SAS token
A Shared Access Signature token - generate a time-limited, scope-limited token to grant access.
Generated using an access key so if the access key is rotated, all SAS tokens generated that way will also expire
User Credentials
A user can also be given access to a storage account through the Active Directory - this could be a Service Principal, your personal login or a ManagedIdentity
These can be managed with the azure-identity python package
Uploading data
Assuming we have a storage account named “myteststorage” with a container named “raw”.
myteststorage/
|-- raw/
Let’s upload a file named test.csv to the container
from azure.storage.blob import BlobServiceClient

# Credentials is whatever credentials type you are using
>>> client = BlobServiceClient("https://myteststorage.blob.core.windows.net", credential="mytoken")
>>> container_client = client.create_container("raw") # client.get_container("raw")
>>> blob_client = container_client.get_blob_client("myfilename.txt")
>>> blob_client.exists()
False

>>> with open("test.csv", mode="rb") as f:
...    blob_client.upload_blob(f)

>>> blob_client.exists()
True
Downloading Data
>>> blob_client.exist()
True

>>> with open("local_file.csv", mode="wb") as f:
...     stream = blob_client.download_blob()
...     f.write(stream.readall())
Exercise 2
In your assigned storage accounts, upload and download a test file
- In your local folder, create a new file with some text
- Using the Azure SDK client library, create a new container named “{your_name}_demo”
- Upload the text file to the container
- Download the file into a test2.txt file locally
- Delete your container
Solution 2
from azure.storage.blob import BlobServiceClient
from azure.core.exceptions import ResourceExistsError

with open("test_file.txt", mode="w") as f:
    f.write("Hello from my test file")

client = BlobServiceClient(
    account_url="https://andersdatalake.blob.core.windows.net",
    credential="mytoken",
)

try:
    container = client.create_container("raw")
except ResourceExistsError:
    container = client.get_container_client("raw")

blob = container.get_blob_client("anders_demo.txt")

with open("test_file.txt", mode="rb") as f:
    blob.upload_blob(f, overwrite=True)

with open("test_file2.txt", mode="wb") as f:
    stream = blob.download_blob()
    f.write(stream.readall())

container.delete_container()
Fsspec
Fsspec is a project started by the Dask people to standardise working on remote filesystems - a core requirement for Dask.
Fsspec helps simplify common operations, and gives a higher-level abstraction
Filesystem Spec (FSSPEC) is a project to unify various projects and classes to work with remote filesystems and file-system-like abstractions using a standard pythonic interface.
Setup
In the same venv as before
pip install fsspec adlfs
Upload a file
fs = fsspec.filesystem("az", account_name="mytestaccount", account_key="mytoken")

## equivalent to
# from adlfs import AzureBlobFileSystem
# fs = AzureBlobFileSystem(account_name="mytestaccount", account_key="mytoken")

fs.put("mylocalfile.csv", "/raw/myblobstoragefile.csv")
Download a file
fs.download("raw/myblobstoragefile.csv", "mylocalfile.csv")
Read and write directly from pandas
One nice feature of fsspec is being able to treat all files the same
import fsspec
import pandas as pd

with fsspec.open("az://raw/test.csv", account_name="mytestaccount", account_key="mytoken") as f:
    df = pd.read_csv(f)

with fsspec.open("az://raw/uploaded.csv", mode="w", account_name="mytestaccount", account_key="mytoken") as f:
    df.to_csv(f)
Filesystem operations
With an fsspec-compatible Filesystem, we can do many of the things we expect from a filesystem.
List files
>>> fs.ls("/raw")
["/raw/uploaded.csv"]
Delete files
>>> fs.rm("/raw/uploaded.csv")
Rename files
>>> fs.rename("raw/uploaded.csv", "raw/myfile.csv")
Exercise 3
- Upload your data from the previous exercise using fsspec instead
- Delete the data using fsspec
Solution 3
import fsspec
from adlfs import AzureBlobFileSystem

fs: AzureBlobFileSystem = fsspec.filesystem("az",
                                            account_name="andersdatalake",
                                            account_key="my_account_key")

with open("hello_fsspec.txt", mode="w") as f:
    f.write("Hello from fsspec!\n")

fs.put("hello_fsspec.txt", "/raw/hello_fsspec.txt", overwrite=True)

fs.download("/raw/hello_fsspec.txt", "hello_fsspec2.txt")

fs.rm("raw/hello_fsspec.txt")
Connections
Notice that we needed access to some sensitive information in order to make the connection to the Storage Blob.
This is generally the case when working with non-public data or databases
Abstract it away
Airflow provides an abstraction, by storing that sensitive connection info encrypted in the metadata database and referring to it in code via the id
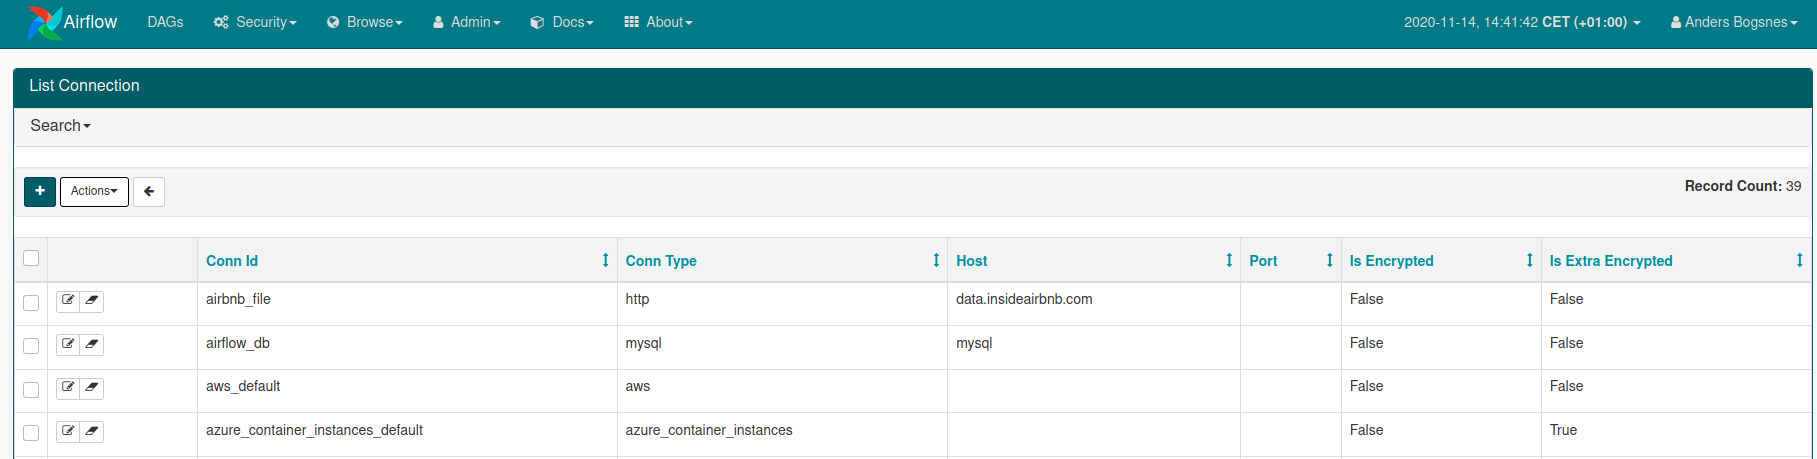
Adding a connection
In the UI, the admin can add a Connection to any backend - Airflow supports a number out of the box. For each operator we want to use, we generally need to add a connection.
Hooks
Interfaces
Hooks serve as reusable interfaces to various services, allowing for code reuse
Example - inserting into a database
If we have a postgres database, we can use the PostgresHook to simplify talking to the database.
from airflow.providers.postgres.hooks.postgres import PostgresHook

# Refer to the connection in the Airflow database
hook = PostgresHook("postgres_conn_id")

hook.bulk_load("mytable", "mydata.csv")
⚠️ Using Hooks with Azure Blob Storage
One of the current issue with Azure Blob Storage SDKs, is that Microsoft recently decided to implement breaking changes to the Blob Storage API.
Downstream, there is still plenty of work left to do to update libraries to work with this breaking change.
Airflow has been focused on the 2.0 release, and still does not support the new API
This will not be an issue, when we switch to Docker images, but know that this can be an issue
WASB protocol
Microsoft tried to introduce the WASB protocol, which is the legacy way of interacting with Azure Blob Storage.
Airflow currently implements the legacy method using WASB connection and the WASB hooks
We will try them in an exercise, but in general we won't use many operators.
Exercise 4
Write a DAG that downloads a month’s worth of data from Inside Airbnb , unzips it and uploads it to your storage account.
- Find an operator that helps with the uploading of the file to WASB
- Setup a connection id in the Airflow UI
- Schedule it to run only once hint
- Some helpful bash commands - wget, gunzip
Solution 4
from airflow import DAG
from airflow.operators.bash_operator import BashOperator
from airflow.contrib.operators.file_to_wasb import FileToWasbOperator
from airflow.operators.dummy_operator import DummyOperator
from airflow.operators.sensors import HttpSensor
from airflow.utils.dates import days_ago

default_args = {
    "owner": "me",
    "start_date": days_ago(2)
}

dag = DAG("upload_test_file",
          description="uploading a test file",
          default_args=default_args,
          schedule_interval="@once")

with dag:
    download_task = BashOperator(
        task_id="download_file",
        bash_command="wget "
                     "http://data.insideairbnb.com/denmark/hovedstaden/copenhagen/2020-06-26"
                     "/data/listings.csv.gz "
                     "-O /tmp/listings.csv.gz"
    )

    unzip = BashOperator(
        task_id="unzip",
        bash_command="gunzip -f /tmp/listings.csv.gz"
    )

    upload_task = FileToWasbOperator(task_id="test_upload",
                                     file_path="/tmp/listings.csv",
                                     container_name="raw",
                                     blob_name="my_test.csv")

    download_task >> unzip >> upload_task
Sensors
Wait for something to happen
A sensor is an operator that runs continously, succeeding only when a condition is met.
These can be used for any task that needs to wait on some external input.
Could be a file landing on a FTP server or some data to land in a database or just wait 10 mins before proceeding.
Example - wait 10 mins
from airflow import DAG
from airflow.sensors.time_delta_sensor import TimeDeltaSensor
from datetime import timedelta

dag = ...


with dag:
    t1 = ...
    wait_10_mins = TimeDeltaSensor(timedelta(min=10))
    t2 = ...
    t1 >> wait_10_mins >> t2
Exercise 5
Add a HttpSensor to the previous workflow that will cause the pipeline to wait if the file is not present
Solution 6
    file_available = HttpSensor(http_conn_id="airbnb_file",
                                task_id="check-is-available",
                                endpoint="denmark/hovedstaden/copenhagen/2020-10-27/data/listings.csv.gz"
                                )
Executing Code
Executors
Airflow is split into 3 main components - 4 if we include the metadata database.
- Scheduler
- Webserver
- Executor
Scheduler
The scheduler is in charge of ensuring that tasks are given to the Executor at the correct time - it doesn’t perform any “work”
Webserver
The webserver is a UI on top of the Scheduler API, and also doesn’t actually do any work
Executor
The executor is the part that actually does the work - Airflow currently has the following executors:
- SequentialExecutor
- LocalExecutor
- DebugExecutor
- KubernetesExecutor
- DaskExecutor
- CeleryExecutor
SequentialExecutor
The SequentialExecutor is the default when running Airflow - it only runs one task at a time and is the most limited executor.
Use for testing, and switch to another in prod
LocalExecutor
LocalExecutor runs tasks in parallel on the machine - If you have a small airflow installation, with only one machine, this is the option to use
DebugExecutor
Designed to use for debugging in your IDE, check details of how to use it here
KubernetesExecutor
Runs each task in a Kubernetes pod - generally the way to run Airflow in a modern setup
DaskExecutor
Runs each task using dask.distributed workers. Great if you already have a dask cluster setup
CeleryExecutor
The “old” main way to run Airflow workers. Celery is a python framework to distribute work to various distributed workers and has been in use for a long time. Still works great, but requires dedicated machines.
Preferred approach
In general, the preferred approach is to run docker images for each task to the extent that is possible.
It means you don’t have to worry about installing all the airflow dependencies in each worker, and lets you write each task’s logic independently.
These images can run on a Kubernetes Cluster, or managed container runtimes like Azure Container Instances, Amazon ECS or Google Cloud Run.
That way our airflow instance can be a small LocalExecutor and the heavy work is done by a managed service.
Exercise 7
Build a docker image to calculate beds per person in the Airbnb Data.
We want to calculate this by dividing the accommodates column by the beds column
- Read the data from your datalake
- Perform the calculation
- Write the result back to the datalake
- Write a Dockerfile to run this code
- Build the image and verify that it runs
Running a Dockerimage DAG
The simplest way to run an image is to use the DockerOperator
But how do we get access to configuration from Airflow inside the image?
Any runtime config must be passed as env to the container instance
Grabbing connections
To use the connections defined in the UI, we can use the BaseHook class
>>> conn = BaseHook.get_connection('my_connection_id')
>>> conn.login
"abc123"
We can write our own Operator inheriting from DockerOperator if we want to run this inside our Operator instance
⚠️ Remember, don't write code that runs every time the DAG is parsed!
Variables
In addition to connections, we can also use the Variables backend to store configuration. This is simpler to use and can be accessed in jinja templating.
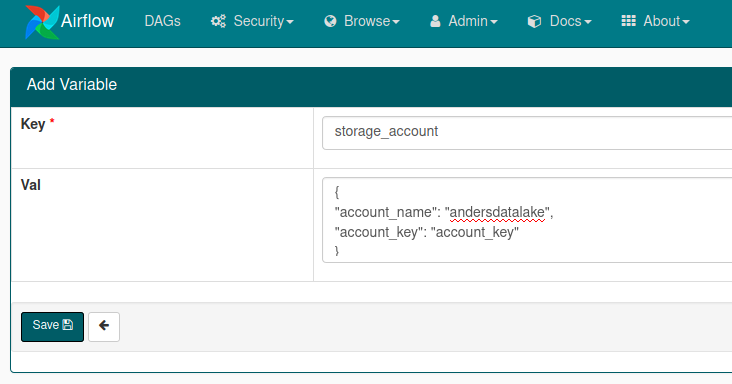
{{ var.variable_name }}
If you have a JSON stored in your variable, Airflow can automatically convert it
{{ var.json.variable_name.json_property }}
Using the Docker Operator
We can use Jinja to dynamically generate commands and configuration, such as the environment variables passed to our docker image.
from airflow.operators import DockerOperator
with dag:
    ...
    transform_task = DockerOperator(
        task_id="transform_data",
        image="test_upload:latest",
        command="transform -d 2020-06-26",
        environment={
            "ACCOUNT_KEY": "{{ var.json.storage_account.account_key }}",
            "ACCOUNT_NAME": "{{ var.json.storage_account.account_name }}"
        })
This works, because we’ve built the image locally - we want to be able to access the image from anywhere
We need to push the image to a container registry
Pushing to a registry
Pushing to a docker registry is simple - we need to have docker login first
docker login <login server>
Now we can tag our image with the name of the registry
docker build -t <login server>/<name of repo>/<image name>:<image tag> .
We can now push the tagged image
docker push <login server>/<name of repo>/<image name>:<image tag>
Now that image ais available to anyone who can log in to your registry
Exercise 8
Now we have a private registry set up, Airflow needs a connection to run our DockerOperator
- Create a connection in the Airflow connections UI
- Set the DockerOperator to use that connection id
- Delete the image from local
docker rmi <name_of_image>
- Try to rerun the pipeline with the pushed image!
Azure Container Instances
In production, we don’t want to use our local machine to run a container
That’s Azure’s job!
Luckily, Airflow already has built in support for running Azure Container Instances
- the AzureContainerInstancesOperator
Exercise 9
We need to replace our DockerOperator with the AzureContainerInstance
- Create a new connection that is allowed to run a ContainerInstance
- Replace the DockerOperator with AzureContainerInstance
- Rerun pipeline!
Key Vaults
Storing secrets
So far, we’ve been passing secrets as environment variables
This works, but there are alternatives!
Passing secrets to a docker container
There are many ways of passing secrets to a docker container
- Environment variables
- Mounting files
- Secrets backend
Environment variables
Environment variables are passed to a container using the -e flag when using docker run
Environment variables are available to any process running on a machine and are not secure, given that someone can access the machine.
Logging systems can dump the ENVs when logging - 😰
They are, however, great for passing configuration, and a better option than hardcoding secrets
Mounting a file
We can mount a file containing our secrets into the container
docker run -v /path/to/secret:/tmp/secret
Inside the container, we can now do
with open("/tmp/secret") as f:
    credentials = f.read()
Now an attacker needs access to the running container, not just the docker host
However, now we need a safe place to store the credentials on our machine! 😟
Secrets Backend
The best option is a secrets Backend, such as Azure Keyvault, AWS Secrets Manager or GCP Secret Manager.
These serve as a secure place to store credentials, where we can grant authenticated access to them.
Backends allow us just-in-time access to secrets, which we can then manage separately from our code
Accessing Azure Keyvault
To interact with Azure Keyvaults, run pip install azure-keyvault-secrets.
To authenticate, we also need to pip install azure-identity
We need the URL to the keyvault - it’s in the format https://{my_key_vault}.vault.azure.net and would be given to you
from azure.keyvault.secrets import SecretClient
from azure.identity import DefaultCredentials

client = SecretClient(vault_url="my_vault_url", credential=DefaultCredentials())
my_secret = client.get_secret("DatabasePassword")
# Use `.value` to access the actual secret value
print(mysecret.value)
Credentials
Authenticating to Azure
Azure needs to know what permissions you or your application has when trying to perform an action
In Python, these are represented as credentials in the azure.identity module
We have access to many variations
- AuthorizationCodeCredential
- AzureCliCredential
- CertificateCredential
- ClientSecretCredential
- DeviceCodeCredential
- EnvironmentCredential
- InteractiveBrowserCredential
- ManagedIdentityCredential
- UsernamePasswordCredential
- VisualStudioCodeCredential
DefaultCredentials
The identity module has a ChainedTokenCredential which is a way of specifying “Try these credentials in order”.
DefaultAzureCredentials is a pre-packaged one which tries
- EnvironmentCredential
- ManagedIdentityCredential
- VisualStudioCodeCredential
- AzureCliCredential
This is usually a good default
EnvironmentCredential
Looks up environment variables to try to authenticate. Need to set the following:
Service principal with secret:
- AZURE_TENANT_ID: ID of the service principal’s tenant. Also called its ‘directory’ ID.
- AZURE_CLIENT_ID: the service principal’s client ID
- AZURE_CLIENT_SECRET: one of the service principal’s client secrets
User with username and password:
- AZURE_CLIENT_ID: the application’s client ID
- AZURE_USERNAME: a username (usually an email address)
- AZURE_PASSWORD: that user’s password
- AZURE_TENANT_ID: (optional) ID of the service principal’s tenant. Also called its ‘directory’ ID.
ManagedIdentityCredential
In Azure, we can assign an identity to a service, such as a VM or webapp.
We can then assign permissions to that identity and allow the webapp to do things
Whenever possible, this is what we want - no storing of credentials! This doesn’t work for local development though
User Authentication
When we want a user to login, we have a few different options
AzureCliCredential
Login with the user who is logged in to the az CLI - works for developers
InteractiveBrowserCredential
Open a browser window and allow the user to login via the browser. This is what Office365 uses
DeviceCodeCredential
Will give the user a code they have to navigate to http://microsoft.com/devicelogin and type in.
ClientSecretCredential
Login using a service principal
Reference material
Airflow docs
Plugins
Tips and tricks
- Apache Airflow Best Practices – Part 1
- Awesome Apache Airflow
- Collaboration between data engineers, data analysts and data scientists
- We’re All Using Airflow Wrong and How to Fix It
- Elegant data pipelining with Apache Airflow
- The Zen of Python and Apache Airflow
- Building a Production-Level ETL Pipeline Platform Using Apache Airflow